
OCR Specification focus:
‘The creation of burhs (origins, functions, growth, consequences); the Burghal Hidage; examples of burhs including Winchester, Oxford, Chichester and Wareham; the links between burhs and local economies’
The Burghal system was central to Alfred the Great’s defensive strategy, combining military fortifications, economic planning, and administrative control to secure Wessex from Viking incursions.
Origins of the Burghal System
The concept of the burh — a fortified settlement — had roots in earlier Anglo-Saxon and Roman defensive traditions but was transformed under Alfred’s reign. The late 9th century saw an urgent need for permanent, strategically placed strongholds to counter the mobility and persistence of Viking forces. After the Great Heathen Army’s campaigns and the peace with Guthrum, Alfred implemented a defensive network designed to prevent enemy penetration into Wessex.
Burh: A fortified settlement, often enclosed by earthen ramparts, ditches, and later stone walls, serving as both a military and administrative centre.
Alfred’s reforms placed burhs at regular intervals, ensuring that no settlement was more than a day’s march (approximately 20 miles) from another, creating overlapping zones of protection.
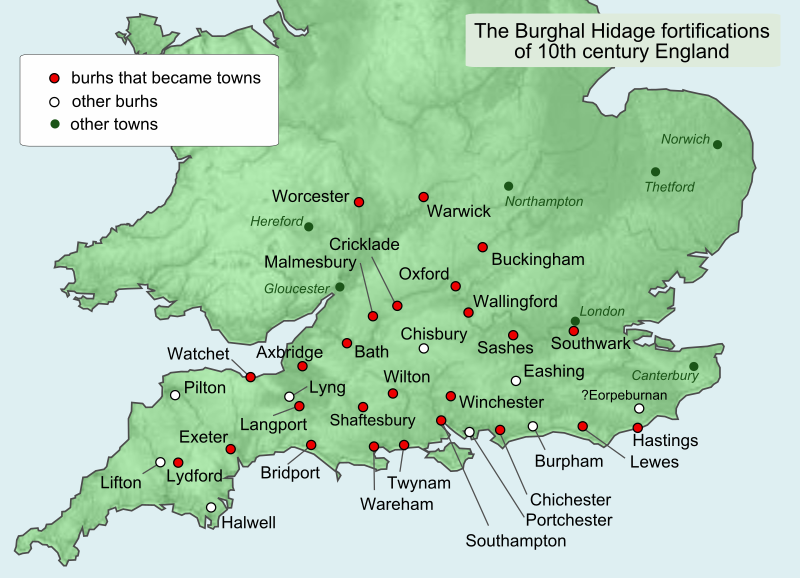
Map of burhs named in the Burghal Hidage, the 10th-century list underpinning Alfredian defence. The schematic shows the spread of fortified centres across southern England and their proximity. It aligns with the idea of overlapping defensive zones that supported rapid mobilisation. Source
Creation and Design
Burhs were either:
Newly constructed on previously undeveloped sites (e.g., Wareham)
Refortified at existing Roman or early medieval settlements (e.g., Winchester, Oxford, Chichester)
Key features included:
Defensive ramparts — initially earthen banks topped with wooden palisades, later reinforced with stone
Ditches in front of ramparts to hinder attackers
Gatehouses controlling access and enhancing defensibility
Street plans often in grid formation to facilitate movement and organisation
The planning incorporated both military needs and civic infrastructure, reflecting Alfred’s integration of defence with governance.
The Burghal Hidage
The Burghal Hidage was a key administrative document listing burhs and the territories (measured in hides) responsible for their maintenance and defence.
Hide: A unit of land measurement, traditionally the amount needed to support a household; used for assessing military and tax obligations.
The Hidage specified:
The total hides allocated to each burh
The number of men each hide had to supply for garrison duty
The correlation between wall length and manpower, ensuring adequate defence forces
This document illustrates the systematic approach Alfred’s administration took in organising defence.
Functions of the Burhs
Military Role
Defence against Viking raids — Burhs provided a secure refuge for surrounding populations and a base for counter-attacks.
Control of movement — Strategic placement at river crossings, road junctions, and borders restricted enemy mobility.
Administrative Role
Centres of local governance — Burhs often housed royal officials and served as places where legal cases were heard.
Tax collection points — Facilitated the efficient gathering of dues and military levies.
Economic Role
Market centres — Concentration of population and security encouraged trade.
Craft production hubs — Blacksmithing, weapon-making, and textile production thrived within burhs.
Examples of Key Burhs
Winchester — Capital of Wessex and major administrative centre; re-fortified to serve as Alfred’s political hub.
Oxford — Refortified Roman settlement at a key Thames crossing, controlling access between Mercia and Wessex.
Chichester — Guarded the south coast and important trade routes.
Wareham — Newly built, guarding a vulnerable coastal inlet and providing rapid response to seaborne threats.
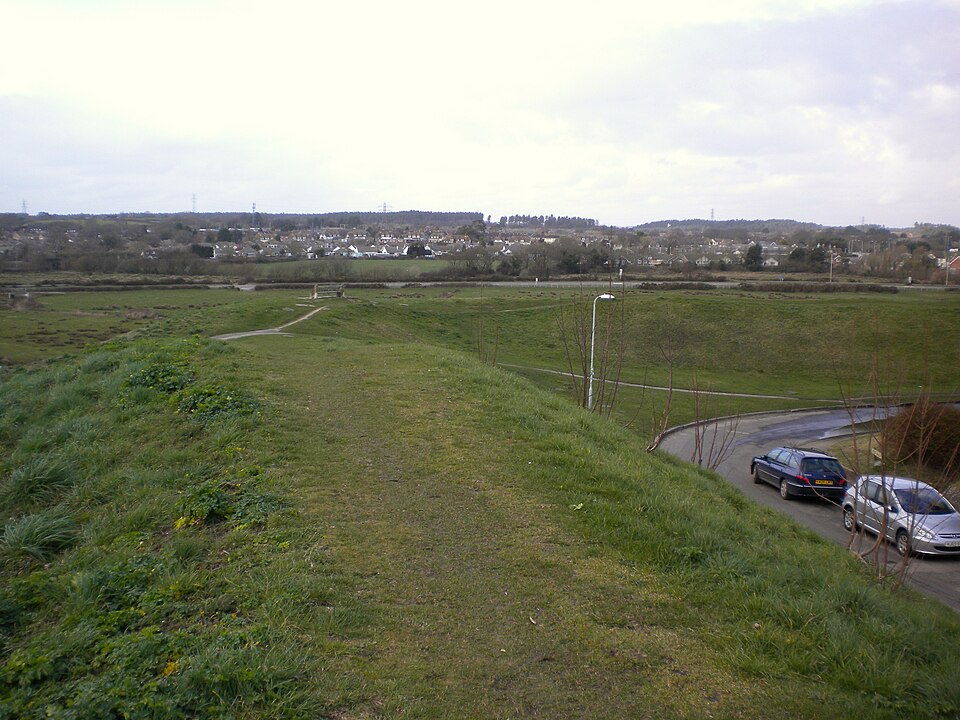
View of the north-western corner of Wareham’s Saxon town walls, showing the substantial earthen bank that originally supported timber defences and later stonework. This exemplifies the newly constructed rampart-and-ditch model described for Alfred’s burhs. The photo is a real-world visual rather than a labelled diagram. Source
Growth and Consequences
The burghal system contributed to:
Urban development — Many burhs evolved into permanent towns, shaping England’s medieval urban network.
Economic integration — Trade between burhs linked local economies, promoting internal stability.
Centralisation of royal authority — Royal control over burhs enhanced the king’s influence in regional affairs.
Military readiness — The standing network allowed rapid mobilisation and reduced reliance on ad-hoc levies.
The presence of secure, fortified settlements reduced the vulnerability of Wessex’s rural population and underpinned Alfred’s broader strategy of survival and recovery.
Links Between Burhs and Local Economies
Burhs and their hinterlands were economically interdependent:
Farmers in the surrounding countryside supplied food and raw materials.
Markets within burhs facilitated exchange and redistributed goods.
The security of burhs encouraged long-distance merchants to operate, expanding economic horizons.
This integration meant that the burghal system was not solely a wartime measure but also a framework for sustained economic growth. By binding defence, trade, and administration together, Alfred ensured that his kingdom could support itself in peace and war.
Logistics and Maintenance
The maintenance of burhs relied on:
Obligatory service from local populations, as defined in the Burghal Hidage
Rotational garrison duty ensuring walls were constantly manned
Repair obligations assigned proportionally to landholders
The system demanded significant resources but was sustainable due to its equitable distribution of obligations.
Strategic Legacy
The burghal network outlasted Alfred’s reign, forming the backbone of Anglo-Saxon defence into the 10th and 11th centuries. It not only thwarted renewed Viking attacks in the 890s but also served as a foundation for later expansion into the Danelaw.
By embedding burhs into the political, military, and economic fabric of Wessex, Alfred created a system that represented a decisive shift from reactive to proactive defence, marking a critical stage in the making of England.
Practice Questions
Question 1 (2 marks)
Name two examples of burhs established or refortified under Alfred the Great’s reign.
Mark Scheme:
1 mark for each correctly named example of a burh from the period.
Acceptable answers include: Winchester, Oxford, Chichester, Wareham.
Maximum 2 marks.
Question 2 (5 marks)
Explain two ways in which the burghal system contributed to the defence of Wessex against Viking attacks.
Mark Scheme:
Award up to 2–3 marks for each valid way explained, to a maximum of 5 marks.
Defensible locations: Burhs were placed at strategic points (river crossings, road junctions, coasts) to control movement and hinder Viking penetration.
1 mark for identifying the strategic placement.
1–2 marks for explaining how this restricted Viking mobility and provided secure refuges.
Garrison and manpower organisation: The Burghal Hidage ensured each burh had enough men to defend its walls through an organised levy system.
1 mark for identifying the manpower system.
1–2 marks for explaining how it allowed rapid mobilisation and constant readiness.
Accept other valid points such as acting as bases for counter-attacks or deterring raids through fortified presence.
FAQ
Locations were chosen for both defensive and economic advantages.
Defensively, Alfred’s planners selected sites controlling key river crossings, road junctions, and coastal approaches to intercept Viking movement. Natural features like rivers or high ground were used to strengthen fortifications.
Economically, locations were chosen to foster local trade and integrate surrounding rural areas, ensuring the burh could be provisioned during sieges.
The Burghal Hidage calculated manpower based on the length of a burh’s defensive walls.
A set number of hides was assigned per length of wall — each hide provided a certain number of fighting men. This meant larger burhs with longer ramparts required more hides (and thus more men) to defend them effectively.
No, construction varied based on local conditions and resources.
Some used earthen ramparts topped with timber palisades, especially where timber was plentiful.
Others reused Roman stone walls or replaced earthworks with stone over time.
The street layout also varied: some were in planned grids, others adapted to pre-existing settlement patterns.
Burhs acted as permanent population centres, encouraging settlement within their walls.
Markets attracted merchants and craftsmen, leading to a concentration of trades and services. Over time, many burhs evolved into towns with civic institutions, helping to establish a lasting urban network in England.
Although primarily defensive, burhs served as bases for offensive operations.
From these strongholds, Alfred’s forces could launch counter-raids or retake territory. Burhs also secured supply lines for advancing armies, allowing Wessex to project power into contested areas like the Danelaw.
