
OCR Specification focus:
‘William’s departure in 1067; the imposition of Norman rule; the suppression of rebellions (including, Exeter 1067, Edwin and Morcar 1068 and the North 1069–1070 Hereward the Wake); the Harrying of the North’
The early years of William I’s reign were turbulent, marked by persistent English resistance and harsh Norman suppression to secure control over newly conquered territory.
William’s Departure and the Fragile Norman Hold (1067)
William's Return to Normandy
In early 1067, William I returned to Normandy, entrusting the rule of England to loyal deputies: Odo of Bayeux and William fitzOsbern. This decision reflected his confidence, but the absence of the king from his newly acquired realm invited unrest.
William's departure caused anxiety and resentment among the Anglo-Saxon population.
The rule of Odo and fitzOsbern was harsh and exploitative, alienating the local elite and population.
Many Anglo-Saxon nobles had expected to retain influence but were swiftly displaced.
Imposition of Norman Rule
The Methods of Control
To impose Norman control, William employed several strategies:
Redistribution of land to Norman lords, marginalising Anglo-Saxon nobility.
Castle-building to enforce military dominance and intimidate local populations.
Implementation of Norman law and administration, often perceived as alien and oppressive.
The speed and scale of these changes created widespread resentment, sparking waves of local resistance across England.
Rebellions Against Norman Rule (1067–1070)
The Rebellion at Exeter (1067)
The city of Exeter, a stronghold of Anglo-Saxon resistance, rebelled in late 1067, likely in protest against new taxation demands and the presence of Norman troops.
The rebellion was supported by Gytha, mother of Harold Godwinson, who resided in the area.
William personally led a campaign to besiege Exeter, resulting in the city's eventual submission after 18 days.
Despite its surrender, the rebellion revealed fragile loyalties and the persistence of English opposition.
Revolt of Edwin and Morcar (1068)
Earls Edwin of Mercia and Morcar of Northumbria, former allies of William, rebelled in 1068, disillusioned by:
William’s failure to honour promises of marriage and increased autonomy.
Encroachment of Norman authority into their regional power bases.
They were joined by rebels in York and the southwest, signalling a coordinated resistance. William responded with swift military action:
He advanced northwards, constructing castles at Warwick and Nottingham to assert control.
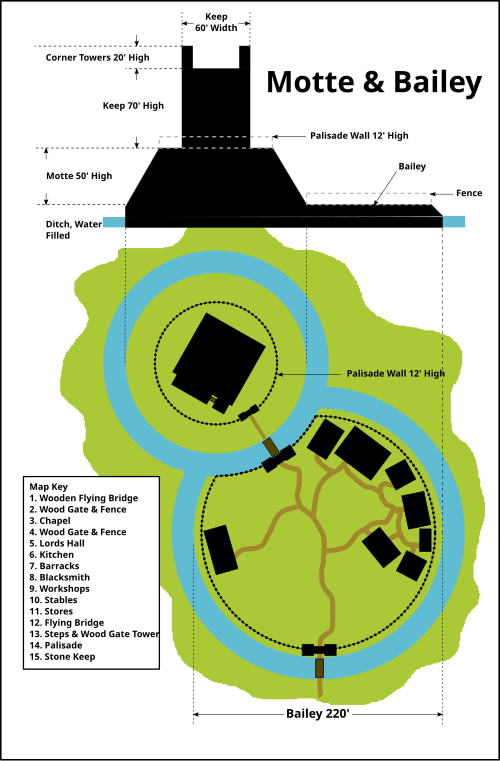
Labeled diagram of a motte-and-bailey castle showing the motte (raised mound), keep, and enclosed bailey with ditch and palisade. Such timber-and-earthworks were rapidly erected across England after 1066 to secure Norman authority. The simplicity and speed of construction made them ideal for suppressing regional unrest, as described in the rebellions of 1067–1068. Source
Edwin and Morcar ultimately submitted, but unrest remained simmering.
The Northern Rebellion and Danish Invasion (1069–1070)
In 1069, a formidable rebellion erupted in York, bolstered by the arrival of a Danish fleet under King Sweyn Estridsson.
York, a vital northern city, became the centre of a major uprising.
Normans suffered severe losses as their castles were attacked and burned.
Danish forces landed in the Humber Estuary, creating a dangerous alliance with English rebels.
William’s response was brutal and calculated. His strategy would come to define this phase of the conquest.
The Harrying of the North (1069–1070)
William’s Campaign of Devastation
In response to the rebellion in the North, William launched a campaign of systematic devastation, known as the Harrying of the North, during the winter of 1069–1070.
Harrying of the North: The widespread destruction of land, livestock, and settlements in northern England by William I to suppress rebellion and deter future resistance.
The campaign involved:
Scorched earth tactics, with the destruction of crops, homes, and food stores.
Mass killings and the displacement of entire communities.
Famine and disease, with chroniclers such as Orderic Vitalis describing corpses unburied and villages left desolate.
Contemporary and modern historians estimate that tens of thousands may have died, and the region never fully recovered economically during William's reign.
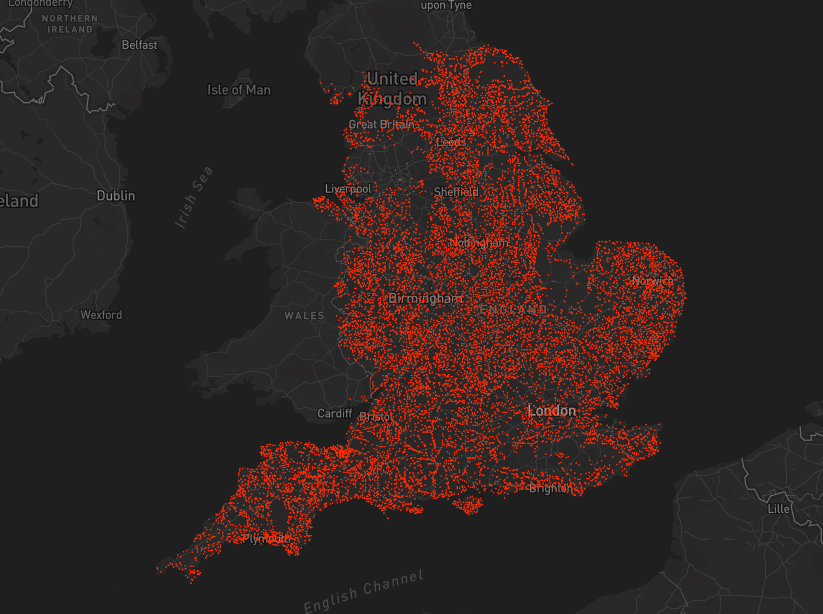
Interactive Domesday Map showing manors recorded as “waste” by 1086. Toggle War → “Destroyed by 1086” to visualise heavily affected northern shires consistent with the Harrying of the North. The interface also displays other areas of devastation (e.g., the New Forest), which are not required by the OCR syllabus but are visible on the same layer. Source
Strategic Aims and Effects
William’s objectives were:
To eradicate the possibility of further northern rebellion.
To punish the population for sheltering rebels and aiding the Danes.
To demonstrate absolute power and deterrence to other potential rebels.
The campaign succeeded militarily, eliminating the Danish threat and quelling resistance in the North. However, it also:
Alienated surviving Anglo-Saxon nobility and clergy.
Attracted criticism from contemporaries, including ecclesiastical figures, for its cruelty and excess.
Damaged long-term economic productivity and social cohesion in the affected areas.
Hereward the Wake and the Ely Rebellion (1070–1071)
Even after the North had been subdued, resistance flared in the Fens of East Anglia, led by the semi-legendary figure Hereward the Wake.
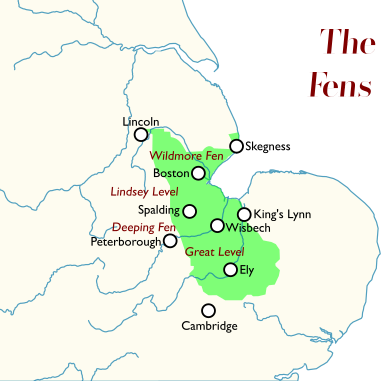
Map of The Fens, situating the Isle of Ely within the fenland landscape of eastern England. The marshy terrain explains the rebels’ defensive advantage during 1070–1071. Note: the base map shows modern geography, which extends slightly beyond the OCR focus but clearly supports spatial understanding of Ely. Source
Joined by exiled nobles and supported by Danes, Hereward attacked Peterborough Abbey and used the Isle of Ely as a base of operations.
William responded with siege tactics, constructing a causeway to reach Ely.
The rebellion was ultimately crushed, and Hereward vanished from records, possibly executed or pardoned.
Hereward the Wake: A prominent figure of Anglo-Saxon resistance against Norman rule, leading guerrilla-style attacks from the Isle of Ely in 1070–1071.
The Ely campaign marked the last significant military resistance to William’s rule.
Summary of Suppression Tactics
William’s suppression of early rebellions involved a combination of:
Military force and personal intervention.
Castle-building to enforce long-term Norman presence.
Punitive actions, such as the Harrying, to crush morale and resistance.
Land redistribution to trusted Norman barons, eliminating Anglo-Saxon power bases.
These methods were effective in consolidating power, but came at a high human and moral cost.
Practice Questions
Question 1 (2 marks)
Give two reasons why William I returned to Normandy in 1067 after the conquest of England.
Mark Scheme:
Award 1 mark for each valid reason, up to a maximum of 2 marks.
Indicative content:
To secure his rule in Normandy. (1)
He believed England was sufficiently under control. (1)
He wanted to reward supporters and manage affairs in Normandy. (1)
Question 2 (6 marks)
Explain how William I responded to rebellion in the north of England between 1069 and 1070.
Mark Scheme:
Level 3 (5–6 marks):
Answers demonstrate detailed knowledge and understanding of events, showing clear explanation of multiple aspects of William’s response.
Indicative content:
Use of military force and devastation in the Harrying of the North. (1)
Deliberate scorched earth policy to destroy food supplies and settlements. (1)
Aimed to punish rebels and prevent future uprisings. (1)
Led to mass famine, displacement and long-term economic decline in the north. (1)
Level 2 (3–4 marks):
Answers show some explanation with relevant knowledge but may be partial or lacking depth.
Level 1 (1–2 marks):
Basic description or vague/generalised comment with limited knowledge.
0 marks: No response or no response worthy of credit.
FAQ
York was the principal city in the north of England, holding strategic, economic, and symbolic value.
It was a vital military stronghold with two castles built by the Normans to secure control. Its location made it a hub for resistance, especially given its proximity to the Danish coast.
For rebels, taking York undermined Norman authority in the north. For William, losing it meant risking control of the entire region.
The Danish fleet’s arrival significantly escalated the threat level.
It created a foreign-backed rebellion, not just a domestic one.
Danish forces allied with local English rebels, especially around York.
William initially attempted negotiations and even paid them off to leave, recognising the logistical challenge of open war with Denmark.
This foreign involvement partly explains the extreme severity of William’s response in the Harrying of the North.
The campaign took place in winter, which posed major difficulties:
Harsh weather made movement and supply difficult for Norman forces.
Northern terrain was less accessible, especially in rural areas.
The destruction of crops and livestock meant his own troops risked starvation.
Despite these issues, William pressed on, accepting short-term logistical hardship to secure long-term dominance.
Yes, especially in the early years:
Edwin and Morcar were Anglo-Saxon earls who initially submitted after 1066 and retained some authority.
Their disillusionment with William’s rule led to the 1068 revolt.
Other nobles either fled, rebelled, or were gradually replaced by Normans as William tightened control.
The period marks the transition from Anglo-Saxon to Norman elite dominance.
Many survivors were displaced or forced into vagrancy.
Chroniclers report famine, with people resorting to eating animals, roots, or corpses.
Some communities never fully recovered; others abandoned the land entirely.
The psychological impact created long-term submission, but also deep resentment.
The devastation became a cautionary tale and a brutal symbol of Norman authority.
