
OCR Specification focus:
‘William of Normandy’s invasion preparations; Hardrada’s invasion, Fulford Gate and the Battle of Stamford Bridge’
The events of 1066 were shaped by meticulous planning, opportunistic strategy, and military skill. Understanding these invasion preparations is key to grasping the Norman Conquest’s origins.
William of Normandy’s Invasion Preparations
Political Context and Claim to the Throne
Following the death of Edward the Confessor in January 1066, the English throne was contested. William, Duke of Normandy, asserted that Edward had promised him the crown and that Harold Godwinson had sworn an oath to support this claim during a visit to Normandy in 1064. The coronation of Harold in January 1066 was seen by William as a breach of both promise and feudal duty, providing him with a casus belli (justification for war).
Securing Papal Support
William sought and received the Papal Banner from Pope Alexander II. This endorsement lent his cause religious legitimacy, framing the invasion as a righteous campaign. Papal support was crucial in attracting recruits from across France, including from Brittany and Flanders.
Military Recruitment and Alliances
William’s preparations involved building a coalition army:
Norman knights formed the backbone of the force, skilled in heavy cavalry tactics.
Allied contingents came from Brittany, Flanders, and other regions, incentivised by the promise of land and plunder.
Recruitment was bolstered by feudal obligations and the lure of participating in a Papal-sanctioned war.
Naval Preparations
William oversaw the construction of a large invasion fleet. Ships were sourced from Norman ports and allied regions.
Longship: A versatile, clinker-built vessel used for transport and combat, capable of both sailing and rowing.
Logistical Planning
Logistics were central to the success of the operation:
Concentration of forces at Dives-sur-Mer in the summer of 1066.
Stockpiling of food, weapons, and armour to sustain the army during transit and initial campaigning.
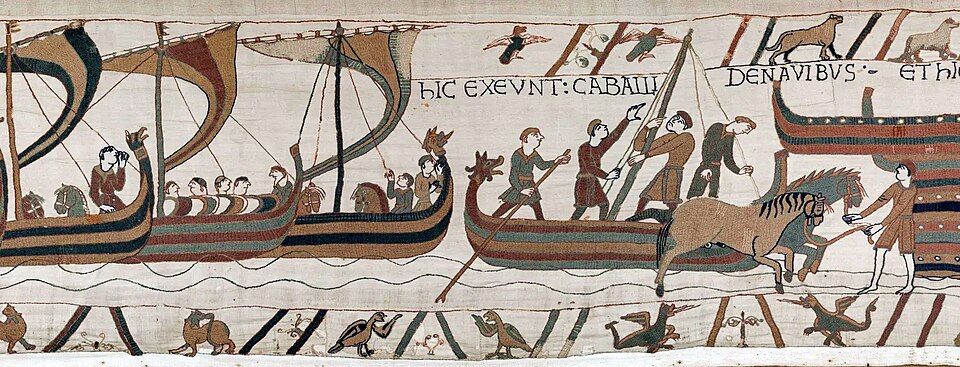
Bayeux Tapestry, Scene 39 depicting men carrying arms and supplies to ships before the Channel crossing. It illustrates Norman logistics and embarkation consistent with the invasion preparations described. As a medieval narrative image, it includes decorative details beyond the syllabus focus. Source
Harald Hardrada’s Invasion
Background to the Norse Claim
Harald Hardrada, King of Norway, claimed the English throne through an agreement made between his predecessor Magnus and Harthacnut of England and Denmark. He allied with Tostig Godwinson, Harold’s exiled brother, creating a potent threat from the north.
Landing and Initial Success
Hardrada’s fleet, reportedly over 300 ships, sailed up the Humber and advanced toward York.
20 September 1066 – Battle of Fulford Gate: Hardrada’s forces, commanded alongside Tostig, defeated the English earls Edwin of Mercia and Morcar of Northumbria, securing York’s submission.
The Battle of Stamford Bridge
Harold Godwinson’s Rapid Response
Upon hearing of the northern threat, Harold Godwinson marched his army over 180 miles in less than a week from London to Yorkshire, catching Hardrada off guard.
25 September 1066 – Battle Details
At Stamford Bridge, Harold’s army surprised the Norwegian forces, many of whom had left their armour on their ships due to expectations of negotiations.
The initial clash saw fierce resistance from a lone Norwegian warrior holding the bridge, delaying Harold’s advance.
Ultimately, Hardrada and Tostig were killed, and Norwegian losses were catastrophic.
Shield Wall: A defensive military formation where soldiers stand shoulder-to-shoulder, interlocking shields to protect against enemy attacks.
The battle ended the Norwegian threat to Harold’s throne but came at a significant cost in manpower and readiness.
Strategic Implications for William
Weather Delays and Timing Advantage
While William’s forces gathered, adverse winds prevented a Channel crossing in August and September 1066. This delay inadvertently worked in William’s favour:
Harold was compelled to divert his attention and forces northward to face Hardrada.
The English army suffered casualties and fatigue at Stamford Bridge, leaving them less prepared for a second invasion.
Norman Landing at Hastings
Once the winds shifted, William crossed the Channel, landing at Pevensey Bay on 28 September 1066 and then moving to Hastings.
#######################################
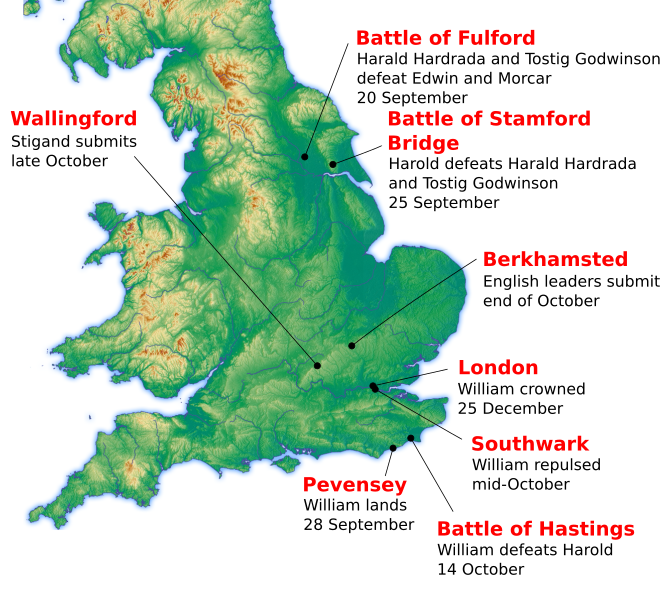
Labeled relief map showing Hardrada’s advance to Fulford and Stamford Bridge, and William’s landing at Pevensey before Hastings. It situates the 1066 operations geographically to clarify sequencing and strategy. The map also marks Berkhamsted and Wallingford, which are helpful context but not required by this specific subsubtopic. Source
Motte-and-Bailey: A type of castle with a wooden or stone keep on a raised earthwork (motte) accompanied by an enclosed courtyard (bailey).
William immediately constructed fortifications to secure his beachhead and provide a defensible base of operations.
Strategic Calculations
William’s campaign was shaped by several key strategic considerations:
Avoiding direct confrontation until Harold’s army was weakened.
Establishing a secure supply line from Normandy to England.
Forcing Harold into a decisive battle on terrain advantageous to Norman cavalry tactics.
Interlinked Campaigns of 1066
The invasions of Hardrada and William were not isolated events but interconnected military operations:
Hardrada’s defeat removed one rival claimant but exhausted Harold’s forces.
William’s timely arrival exploited the strategic opening created by the northern campaign.
The dual invasions highlight the multi-front threat faced by Anglo-Saxon England in 1066, a factor critical to William’s eventual success at the Battle of Hastings.
Practice Questions
Question 1 (2 marks)
Name two reasons why William of Normandy sought and obtained Papal support for his invasion of England in 1066.
Mark Scheme:
1 mark for each correct reason (maximum 2 marks).
Acceptable answers include:To give his claim to the English throne religious legitimacy.
To encourage recruitment by framing the invasion as a holy or righteous cause.
To unite and motivate forces from different regions under a common religious banner.
To gain moral authority over Harold Godwinson in the eyes of Christendom.
Question 2 (5 marks)
Explain two ways in which Harald Hardrada’s invasion affected Harold Godwinson’s ability to respond to William of Normandy’s landing in 1066.
Mark Scheme:
Award up to 5 marks:
1–2 marks for identifying each valid way (maximum 2 ways).
1–2 additional marks per way for clear explanation showing impact on Harold’s response.
Indicative content:
Way 1: The battle at Stamford Bridge caused significant casualties and fatigue among Harold’s army.
(1 mark) Identification: Losses at Stamford Bridge weakened Harold’s forces.
(1 mark) Explanation: This meant Harold faced William with fewer experienced troops and reduced readiness.
Way 2: The rapid march from London to York and back left Harold’s army exhausted.
(1 mark) Identification: The long marches drained soldiers’ stamina.
(1 mark) Explanation: The fatigue limited their effectiveness in battle against William at Hastings.
Other acceptable answers could include:
Hardrada’s threat forced Harold to divert his attention north, giving William more time to land and prepare.
The northern campaign depleted Harold’s supplies and logistical capacity for a southern defence.
FAQ
Tostig, Harold Godwinson’s exiled brother, sought revenge after being ousted as Earl of Northumbria in 1065. He approached several rulers for support before allying with Harald Hardrada.
His knowledge of English politics and northern terrain made him valuable. He promised local backing in the north, hoping discontent with Harold’s rule would draw recruits to Hardrada’s cause.
Pevensey Bay offered a sheltered beach and proximity to Hastings, making it a defensible position with good access to supplies and reinforcements from the sea.
The nearby Roman fort provided a ready-made defensive structure, and the area had fertile land to support the army during the campaign. Its location in Sussex also placed William close to key routes inland.
Persistent northerly winds in August–September 1066 delayed William’s Channel crossing, keeping his fleet in Normandy for weeks.
This delay inadvertently benefited him, as Harold’s forces were occupied fighting Hardrada in the north. When winds turned southerly, William crossed quickly before Harold could fully regroup.
Cavalry horses required specialised transport ships, often adapted with reinforced decking and ramps.
Challenges included:
Ensuring adequate fodder and water during the voyage.
Preventing injury to horses in rough seas.
Coordinating simultaneous loading of men, horses, and supplies without overcrowding vessels.
The Norwegian victory at Fulford forced York’s submission and temporarily secured Hardrada’s control in the north.
It compelled Harold to march his army rapidly from London, stretching his logistical capacity. This northward focus created the strategic gap William exploited with his landing in the south.
