
OCR Specification focus:
‘Hardrada’s invasion, Fulford Gate and the Battle of Stamford Bridge; the Norman landings in Hastings and Harold’s response’
This section examines the pivotal events of September 1066, when Harold Hardrada’s Norwegian invasion tested Harold Godwinson’s kingship, culminating in rapid military manoeuvres that shaped England’s fate.
Background to Hardrada’s Invasion
Harold Hardrada, King of Norway, pressed his claim to the English throne in 1066, supported by Tostig Godwinson, Harold Godwinson’s exiled brother. Hardrada’s claim was based on an alleged agreement between King Harthacnut and Magnus of Norway that if either died without an heir, the other would inherit England. Though politically tenuous, it provided a pretext for intervention.
Motivations for Invasion
Dynastic ambition: Hardrada sought to expand his influence into England.
Revenge and political opportunity: Tostig aimed to reclaim the Earldom of Northumbria, lost in 1065.
Timing: Harold Godwinson’s recent coronation (January 1066) created uncertainty and opportunities for challengers.
Hardrada amassed a fleet estimated at over 300 ships, sailing along the English coast to the Humber, then up the River Ouse to Riccall.
The Battle of Fulford Gate – 20 September 1066
The first major confrontation of the Norwegian campaign occurred near Fulford, just outside York. Earls Edwin of Mercia and Morcar of Northumbria led the English defence.
Course of the Battle
Edwin and Morcar positioned their forces with the River Ouse on one flank and marshland on the other, aiming to funnel the Norwegian advance.
Hardrada and Tostig’s forces, experienced and heavily armoured, used a shield wall to press the attack.
As the tide fell, the Norwegians were able to outflank the English via the marshes, overwhelming the defenders.
Outcome and Consequences
English forces suffered heavy losses; Edwin and Morcar retreated.
York surrendered to Hardrada, agreeing to provide hostages and supplies.
The victory left Hardrada and Tostig confident and less cautious in subsequent actions.
The March to Stamford Bridge – Harold’s Rapid Response
Upon hearing of Fulford, Harold Godwinson force-marched his army from London to York — covering roughly 190 miles in under a week. This feat showcased his logistical skill and the endurance of his housecarls (professional troops) and fyrd (levied militia).
Housecarls: Elite, well-trained soldiers forming the king’s permanent military household, equipped with heavy armour and Danish axes.
Harold’s arrival at Tadcaster on 24 September placed him within striking distance of the Norwegian camp.
Harold’s rapid redeployment linked the northern theatre (Fulford and Stamford Bridge) with the southern crisis triggered by William’s landing at Pevensey.
#######################################
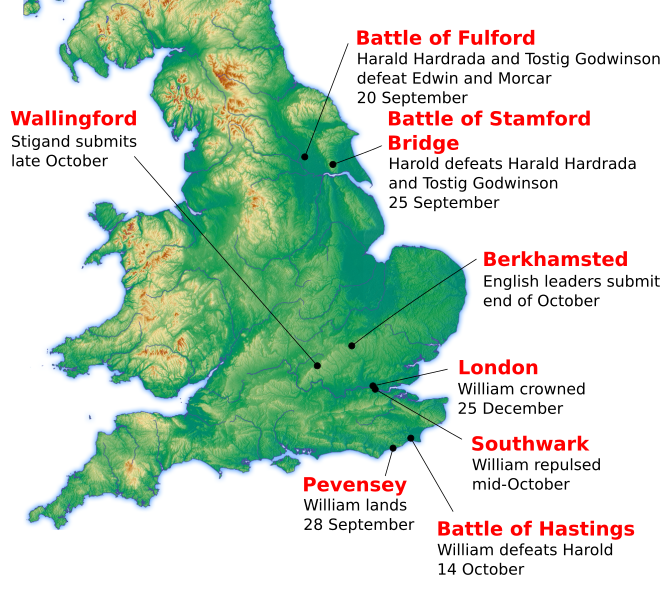
Overview of the 1066 campaigns showing the Norwegian advance toward York and the battles at Fulford and Stamford Bridge, plus the Norman landing at Pevensey. Use this to visualise Harold’s strategic dilemma and forced marches between the northern and southern fronts. The map also includes the Battle of Hastings for context beyond this sub-subtopic. Source
The Battle of Stamford Bridge – 25 September 1066
Hardrada and Tostig, believing Harold still in the south, had left much of their army and armour at Riccall, bringing only part of their force to Stamford Bridge to collect York’s hostages.
Course of the Battle
Surprise and Shock
Harold’s sudden arrival caught the Norwegians unarmoured and spread out.
Negotiations failed; Harold offered Tostig restoration of his earldom if he abandoned Hardrada, which Tostig refused.
Initial Resistance
A lone Norwegian warrior held the narrow bridge, delaying the English advance until killed from beneath.
Main Engagement
The English shield wall pushed forward, exploiting the Norwegians’ lack of defensive equipment.
Hardrada was killed by an arrow to the throat; Tostig assumed command but was also slain.
Arrival of Reinforcements
The Norwegian reserve from Riccall arrived too late and was defeated.
The crossing over the River Derwent at Stamford Bridge created a bottleneck that split the Norwegian force and exposed their position when Harold arrived.
Outcome
Norwegian losses were catastrophic; of the invasion fleet, only about 24 ships returned to Norway.
Harold had neutralised a major rival but at heavy cost in men and energy.
Norman Landings at Hastings – Harold’s Dilemma
While Harold celebrated at York, William of Normandy landed at Pevensey (28 September 1066) with his invasion force, having waited out unfavourable winds. This placed Harold in a perilous strategic position.
Harold’s Strategic Options
Remain in the north to consolidate power and recover.
March south immediately to confront William before he could fortify his position.
Harold chose the latter, marching his army over 250 miles in under a fortnight. This decision reflected both urgency and the risk of allowing William time to gather supplies and support.
Harold’s Response to William’s Landing
Harold paused in London to gather additional forces, though many northern levies had been lost at Stamford Bridge.
Scouts reported Norman fortifications at Hastings, confirming William’s readiness for battle.
Harold advanced rapidly, seeking to force a decisive engagement before more of William’s allies could arrive.
William landed at Pevensey on 28 September and secured a defensible base within the old Roman fort before advancing inland.
#######################################
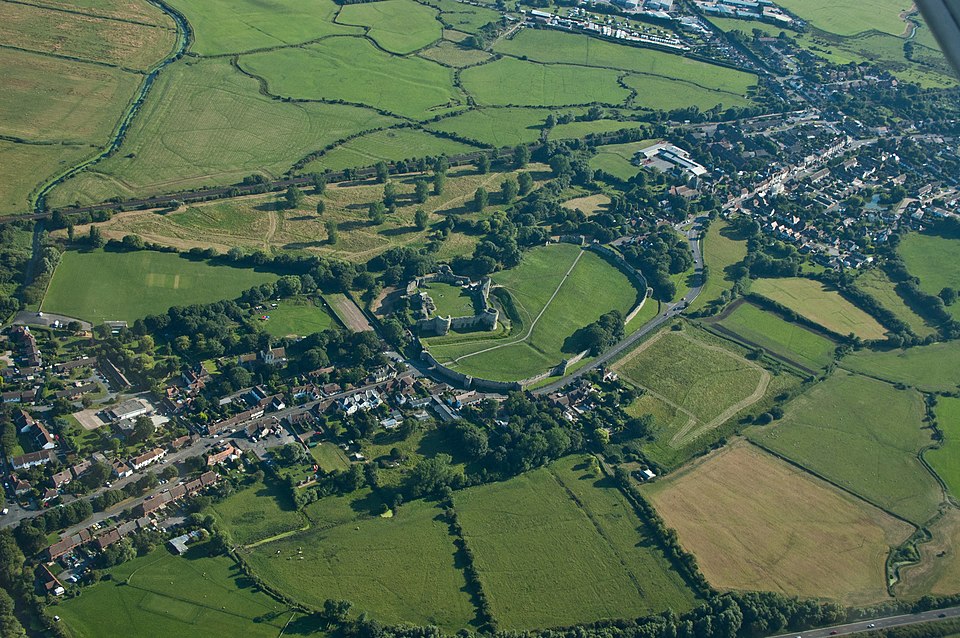
Pevensey Castle and village seen from above, showing the substantial Roman circuit later occupied and adapted by the Normans in September 1066. This illustrates how the landing force quickly gained a fortified lodgement to support cavalry and supplies. Extra contextual detail: the page discusses Pevensey’s longer history beyond 1066. Source
Factors Influencing Harold’s Decision
Political necessity: Defending his crown against a foreign claimant was paramount to legitimacy.
Morale concerns: A prolonged wait could weaken fyrd loyalty, as troops were bound by limited service terms.
Intelligence and logistics: The risk of William cutting off supplies to the south-east increased with delay.
Significance of the Campaigns at Fulford and Stamford Bridge
Demonstrated the multi-front threats facing Harold in 1066.
Showed the crucial role of speed, surprise, and logistics in medieval warfare.
The northern victories came at the cost of exhaustion and casualties, weakening Harold before the decisive Battle of Hastings.
Practice Questions
Question 1 (2 marks)
In which year did the Battle of Fulford take place, and which two English earls commanded the defending forces?
Mark scheme:
1 mark for correctly identifying the year 1066.
1 mark for naming both Earl Edwin of Mercia and Earl Morcar of Northumbria.
Question 2 (5 marks)
Explain two reasons why Harold Godwinson was able to achieve victory at the Battle of Stamford Bridge.
Mark scheme:
Award up to 3 marks for each well-explained reason, to a maximum of 5 marks in total.
Surprise attack: 1 mark for identifying Harold’s unexpected arrival; 1–2 marks for explaining how rapid marching from the south caught the Norwegians off guard without full armour.
Norwegian disadvantage: 1 mark for identifying that Hardrada’s forces were unarmoured or split; 1–2 marks for explaining how this reduced their defensive capability and allowed Harold’s troops to break their formation.
Accept other valid points such as Harold’s use of the shield wall, Hardrada’s death during the battle, and the late arrival of Norwegian reinforcements — but award marks only where explanation links clearly to victory.
FAQ
Tostig acted as both political ally and local guide for Hardrada. Having been exiled from England in 1065, he sought revenge against Harold Godwinson and aimed to reclaim the Earldom of Northumbria.
He recruited ships and men from Flanders and Scotland, joining Hardrada’s fleet before they sailed to the Humber. Tostig’s knowledge of northern England aided the Norwegians in navigating the coast and selecting landing points.
Fulford lay near marshland and the tidal River Ouse. The English defensive position used these features to anchor their flanks.
However, as the tide fell, the Norwegians exploited the exposed ground to outflank Edwin and Morcar’s forces. This shift turned the geographical advantage into a vulnerability, contributing to the English defeat.
Harold’s offer aimed to divide the enemy. By restoring Tostig’s title, Harold hoped to weaken Hardrada’s support and possibly avoid full-scale combat.
It was also a political manoeuvre to show magnanimity, potentially undermining the loyalty of Norwegian allies who had joined to back Tostig’s cause. The refusal solidified the unity of the invading force.
The surviving ships, around 24 of the original 300, were used to transport the few survivors back to Norway.
Many vessels had been left undermanned during the march to Stamford Bridge, and losses in the battle left insufficient crews to sail the remainder. The fleet’s reduction symbolised the scale of the defeat and marked the end of Viking attempts to conquer England.
The marches from London to York, then to Hastings, demanded extreme physical endurance from both housecarls and fyrd.
From London to York: Around 190 miles in under a week.
From York to Hastings: Around 250 miles in less than a fortnight.
While these movements showed Harold’s logistical capability, they left many troops fatigued and reduced in number. This exhaustion likely impacted performance against the Normans at Hastings.
