
OCR Specification focus:
‘Prepare and examine slides with eyepiece graticule, stage micrometer and differential stains.’
Microscopy relies on prepared slides, accurate measurement tools and staining techniques to enhance contrast and reveal structure. Mastering these skills enables reliable observation, comparison and recording of biological specimens.
Slide Preparation
Accurate slide preparation is essential for obtaining clear images and meaningful biological observations. Students must be confident in preparing both wet mounts and fixed, stained slides to visualise cells and tissues effectively.
Wet-mount Slides
A wet mount is a slide where the specimen is suspended in liquid, preventing dehydration and allowing observation of living material. Wet mounts are prepared for fresh tissues, small organisms and motile cells.
Process:
Place a thin specimen in a drop of water or appropriate solution on a clean slide
Lower a coverslip at an angle using a mounted needle to reduce air bubbles
Remove excess liquid with absorbent paper if needed
Staining and Fixing
Most cells lack contrast because they are largely transparent.
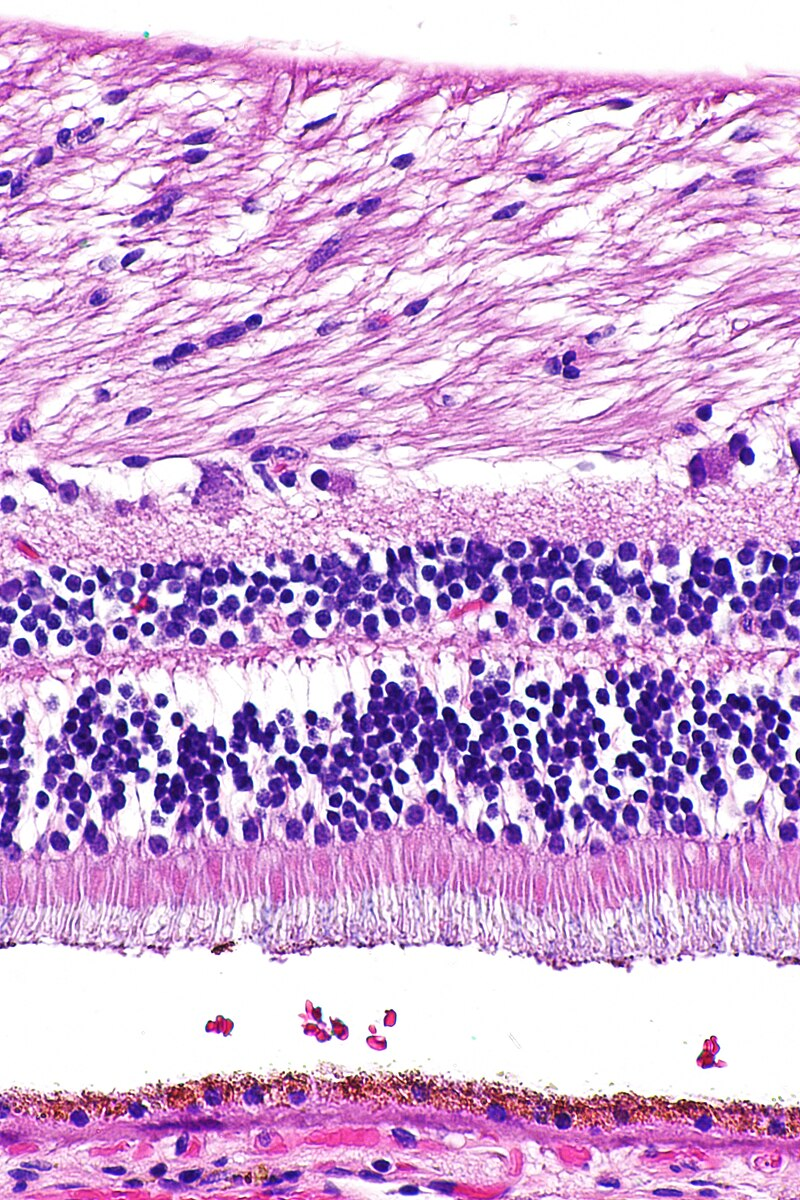
H&E staining shows purple-blue nuclei (haematoxylin) and pink cytoplasm or extracellular regions (eosin), demonstrating how staining provides contrast to otherwise transparent tissues. Source.
Staining is the use of coloured chemicals to improve contrast, while fixing preserves tissue and prevents decay. Differential staining is a type of staining that uses multiple dyes to distinguish different cellular structures or cell types.
Differential staining: A staining technique using more than one dye to distinguish between structures or types of cell.
Before staining, specimens may be fixed (preserved), sectioned (cut thinly), and mounted (secured under a coverslip). Common stains include:
Methylene blue for nuclei
Haematoxylin for chromatin
Eosin for cytoplasm
Gram stain to distinguish Gram-positive and Gram-negative bacteria
Using Eyepiece Graticules and Stage Micrometers
Biologists must measure cells accurately. This requires two key instruments: the eyepiece graticule and the stage micrometer.
Eyepiece Graticule
The eyepiece graticule is a transparent scale inserted into the microscope eyepiece. It has arbitrary units, which must be calibrated before use. Once calibrated, it can be used to measure cell size and organelle dimensions.
Eyepiece graticule: A scale in the microscope eyepiece used to measure specimens in calibrated units.
Stage Micrometer
A stage micrometer is a slide with a precise scale, usually 1 mm long divided into 100 divisions (each 0.01 mm or 10 µm). It is used to convert the arbitrary units on the eyepiece graticule into real measurements.
Stage micrometer: A microscope slide with an accurate scale used to calibrate an eyepiece graticule.
Calibration
Calibration ensures that each graticule division corresponds to a known length at a particular magnification.
One normal sentence appears here to maintain appropriate spacing before including an equation.
EQUATION
—-----------------------------------------------------------------
Calibration (µm per graticule unit) = Known distance on micrometer (µm) ÷ Number of graticule divisions
µm = micrometres, the unit of measurement for cells and organelles
—-----------------------------------------------------------------
Once calibrated, the graticule can measure cells by counting divisions across the specimen.
Differential Staining in Cell Observation
Differential stains reveal features that would otherwise be invisible.
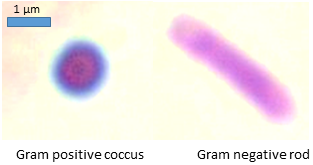
A Gram-stained mixed bacterial sample, with purple Gram-positive cocci and pink Gram-negative rods, demonstrating how differential stains distinguish cell types by structural differences in their walls. Source.
This is especially important in histology, haematology and microbiology.
Examples include:
Gram staining to distinguish bacterial cell walls
Acid–fast staining to identify Mycobacterium species
Haematoxylin and eosin (H&E) staining for tissue sections
Purpose of Differential Staining
Differential staining:
Enhances contrast
Highlights organelles and tissue organisation
Distinguishes cell types in mixed samples
Aids diagnosis in medical contexts
Good Practice in Microscopy Skills
To produce valid observations, students must apply consistent slide-handling and recording techniques.
Recommended practices:
Use thin specimens for improved light transmission
Avoid air bubbles and overstaining
Start focusing on low power before moving to high power
Record observations using clear, labelled biological drawings
Accurate slide preparation, correct calibration of measurement tools and purposeful use of differential stains are core skills that allow OCR Biology students to observe, measure and interpret microscopic structures with confidence.
Practice Questions
Question 1 (2 marks):
Explain why differential staining is used when preparing slides for light microscopy.
Question 1 (2 marks)
Award 1 mark for each valid point, up to 2 marks:
Differential staining provides contrast so that cell structures are visible. (1)
It allows different organelles or cell types to be distinguished from each other. (1)
Question 2 (5 marks):
A student uses an eyepiece graticule and a stage micrometer to measure the diameter of a plant cell.
Describe how the student should calibrate the eyepiece graticule and then use it to obtain an accurate measurement of the cell.
Your answer should include the key steps and reasoning.
Question 2 (5 marks)
Award marks for the following relevant points, up to 5 marks:
Stage micrometer is viewed to provide a known scale under the chosen objective lens. (1)
Graticule divisions are aligned with the micrometer scale to calculate the real length represented by one graticule unit. (1)
Calibration must be repeated for each magnification. (1)
Student measures the cell by counting the number of graticule divisions across its diameter. (1)
Measurement is converted into micrometres using the previously calculated calibration value. (1)
FAQ
Overstaining can obscure fine detail because dark, heavily stained areas absorb too much light, reducing contrast between structures. If multiple dyes are used, one stain may dominate and mask the others, preventing clear differentiation of organelles.
To avoid this, stains should be diluted appropriately, exposure time should be controlled, and excess dye should be washed off to restore clarity.
Thin specimens allow sufficient light to pass through, which is essential for clear image formation. Thick samples scatter or block light, reducing resolution and making it harder to bring structures into focus.
In addition, thin sections ensure that only one or a few layers of cells are viewed at a time, preventing overlapping tissue from hiding important features.
A wet mount preserves natural cell behaviour, allowing students to observe movement, cytoplasmic streaming or cilia action.
Because cells remain hydrated, they maintain their normal shape and do not undergo distortion caused by drying. Wet mounts also minimise preparation time, making them useful for live, temporary observations.
Errors become evident when repeated measurements of identically sized cells produce inconsistent or unrealistic values.
Problems usually arise from:
Misalignment of the micrometer and graticule scales
Reading the wrong division
Changing magnification without recalibrating
Repeating the calibration and checking against the stage micrometer should resolve the issue.
Stains bind to particular chemical components. For example, dyes that bind to DNA highlight nuclei, while acidic dyes bind to positively charged cytoplasmic proteins.
Because organelles vary in composition, targeted dyes can selectively enhance certain structures. This specificity makes interpretation clearer and supports accurate identification under the microscope.
