
OCR Specification focus:
‘Use a light microscope at low and high power, including a graticule, and produce annotated scientific drawings from observations.’
Microscopy and scientific drawings are essential practical skills in biology, allowing students to observe fine structural detail, collect accurate measurements and record findings clearly and scientifically in diagrams for analysis.
Light microscopy
Light microscopes use visible light and glass lenses to form a magnified image of a specimen, enabling observation of cells and tissues. Magnification is how many times larger an image appears compared to the object, while resolution is the ability to distinguish two points as separate. Resolution limits what detail can be seen using light, but careful preparation and correct use improve image quality.
Magnification: The number of times larger an image is compared to the real specimen.
Students must be able to use a light microscope at low and high power, adjusting focus and illumination for clarity. When preparing a slide, specimens are placed on a clean slide, treated with stain if needed, and covered with a cover slip to protect the lens and sample. Samples must be thin to allow light to pass through.
After introducing a specimen on low power to locate structures, higher magnification is then used for detailed observation. Correct focusing uses the coarse focus at low power and fine focus for high power to prevent damage to the slide or objective lens.
Using a graticule for measurement
A graticule is a scale fitted into the microscope eyepiece that allows measurement of cells and structures. Because the scale has no fixed units, it must be calibrated using a stage micrometer.
Stage micrometer: A microscope slide with a precisely known scale used for calibration.
To calibrate a graticule:
• Align the graticule scale with the micrometer scale under low power
• Calculate the value of one graticule division
• Repeat for each objective lens, because magnification alters scale
Once calibrated, the graticule enables quantitative recording, reinforcing the specification requirement for accurate measurement using appropriate apparatus. Measurements can then be added as annotations in biological drawings or used in calculations of magnification or cell size.
A sentence of normal text is placed here to follow guideline rules before any further formatted blocks.
EQUATION
—-----------------------------------------------------------------
Magnification (no unit) = Image size ÷ Actual size
Image size = Measured length of the specimen in the image (mm)
Actual size = Real size of the specimen (mm or μm)
—-----------------------------------------------------------------
Producing scientific drawings
Scientific drawings provide a clear and precise visual record of what is seen under the microscope.
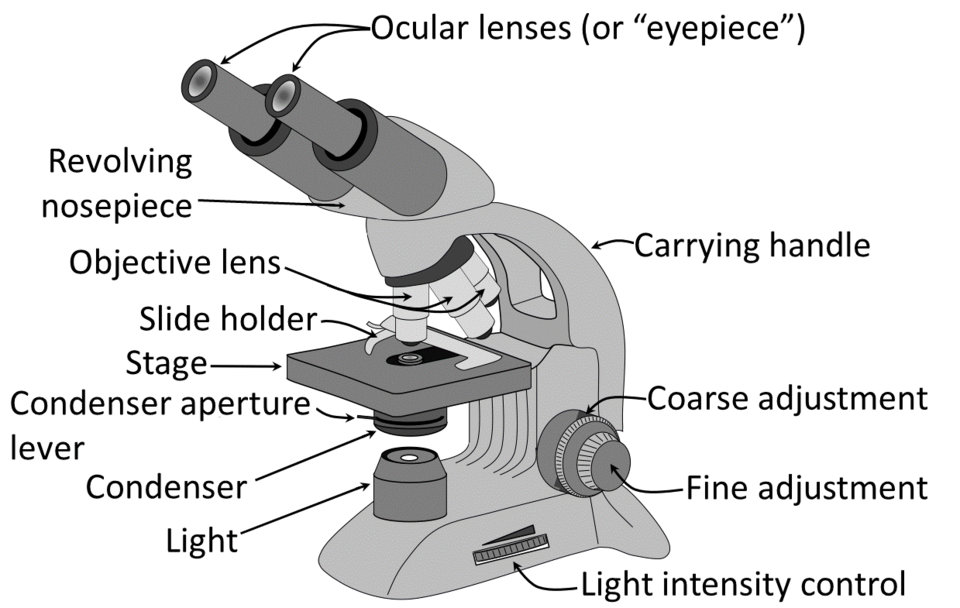
A labelled diagram of a compound light microscope showing the eyepiece, nosepiece, objectives, stage, condenser and focusing controls, supporting correct use at low and high power. Source.
They must not be artistic sketches, but accurate biological representations that follow standard conventions.
Drawings should:
• Use sharp pencil lines with no shading
• Include annotations explaining visible structures
• Be large enough to show detail
• Include magnification or scale
• Show only what is visible through the microscope
Proportion and clarity are more important than decoration. Students must observe carefully and capture only real features, avoiding imaginary lines or assumptions.
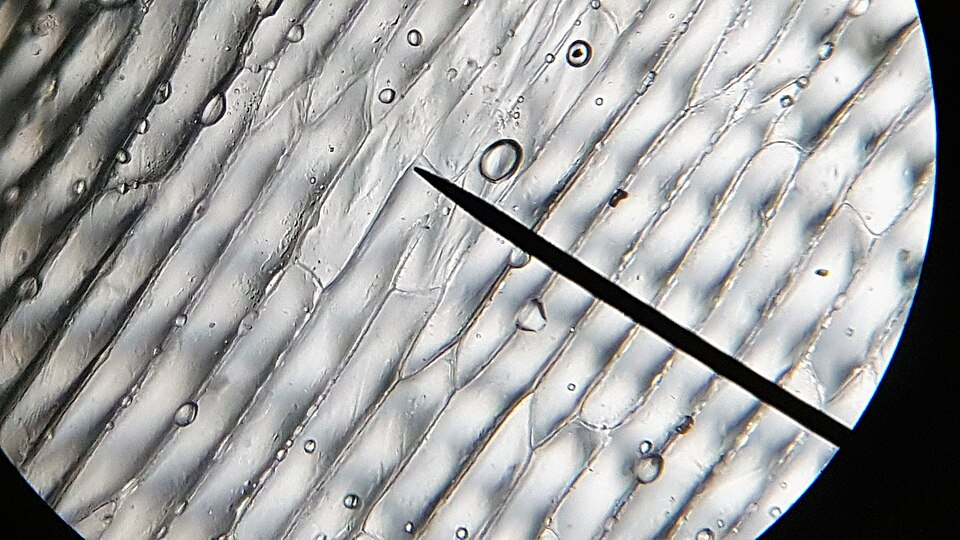
Brightfield micrograph of onion epidermal cells, suitable for practising annotated biological drawings and applying scale bars after graticule calibration. Source.
Staining techniques
Biological samples often lack contrast, making staining vital for microscopy. Stains bind to specific structures, improving visibility. Common stains include methylene blue for nuclei and iodine solution for starch-containing structures in plant cells. Staining increases contrast, making organelles more distinct and improving observations for drawing and measurement.
Low-power and high-power plans
When studying tissues, students should produce:
• Low-power plan: outlining main tissues and structure boundaries, with no cell detail
• High-power drawing: showing a smaller area with full cellular detail and clear labels
This layered approach mirrors the way microscopes are used and supports systematic observation.
Good microscopy practice
To meet the specification effectively, a student should:
• Start at low power to locate the specimen
• Adjust the diaphragm for optimum light
• Use fine focus at high power
• Avoid pressing the objective lens onto the slide
• Clean lenses with lens tissue only
Annotation and labelling
Annotations must add biological meaning, not just labels. For example, an arrow should point to the cell wall, with a note stating its function or visible characteristic. All labels should be horizontal and neatly aligned for clarity.
Common errors to avoid
Students should avoid:
• Shading or colouring
• Too-small diagrams
• Irregular cell shapes where regularity is expected
• Missing scale information
• Drawing features not visible on the slide
These errors reduce scientific value and accuracy. Developing disciplined drawing and observation habits ensures clear communication of findings and aligns with OCR expectations for microscopy and scientific recording.
Practice Questions
Question 1 (2 marks)
A student prepares a slide of onion epidermis and views it under a light microscope. Explain why the student should begin observations using the low-power objective lens before switching to a higher magnification.
Question 1 (2 marks)
Award 1 mark for each valid point:
• Easier to locate and focus on the specimen at low magnification. (1)
• Reduces the risk of crashing the objective lens into the slide while focusing. (1)
Question 2 (5 marks)
A student uses a light microscope with an eyepiece graticule to measure the diameter of a plant cell. The graticule has been calibrated so that each division represents 10 micrometres at the chosen magnification. The cell is measured as 6 graticule divisions across.
(a) State the actual diameter of the cell. (1 mark)
(b) Describe how the eyepiece graticule is calibrated before it can be used for measurements. (4 marks)
Question 2 (5 marks)
(a) 6 divisions × 10 micrometres = 60 micrometres. (1)
(b) Award 1 mark for each of the following points (max 4):
• Place a stage micrometer on the microscope stage. (1)
• View both the stage micrometer scale and eyepiece graticule scale together and align the scales. (1)
• Calculate the value of one graticule division by comparing it with the known micrometer scale. (1)
• Repeat for each objective lens because calibration changes with magnification. (1)
FAQ
The iris diaphragm controls the amount of light passing through the specimen. Adjusting it can improve contrast and reduce glare, which is especially useful when viewing transparent cells.
A narrower opening increases contrast, helping structures such as cell walls become more visible. A wider opening allows more light through, useful at higher magnifications where the image is darker.
Shading introduces subjectivity and makes diagrams harder to interpret. Scientific drawings must prioritise clarity and consistency over artistic style.
Clean, single lines ensure features are easy to compare between specimens and between scientists. Labels and annotations should carry meaning, not artistic effects.
Students should regularly compare the drawn structure to the field of view, checking shapes and relative sizes before adding detail.
Useful approaches include:
• lightly sketching outlines before committing to darker pencil lines
• working from large structures to small ones
• referencing the graticule measurement if scale is included
Unstained specimens often lack contrast because many cellular components are transparent. Stains bind to particular structures, increasing visibility.
However, specimens with naturally pigmented tissues, thick walls or obvious boundaries may not require stains to be seen clearly under a light microscope.
Onion epidermis consists of a single, flat layer of regularly shaped cells, making it ideal for beginners to focus, observe and draw without visual clutter.
Its cells are large, easy to stain, and produce clear outlines, helping students practise measurement, annotation and scale bar skills effectively.
